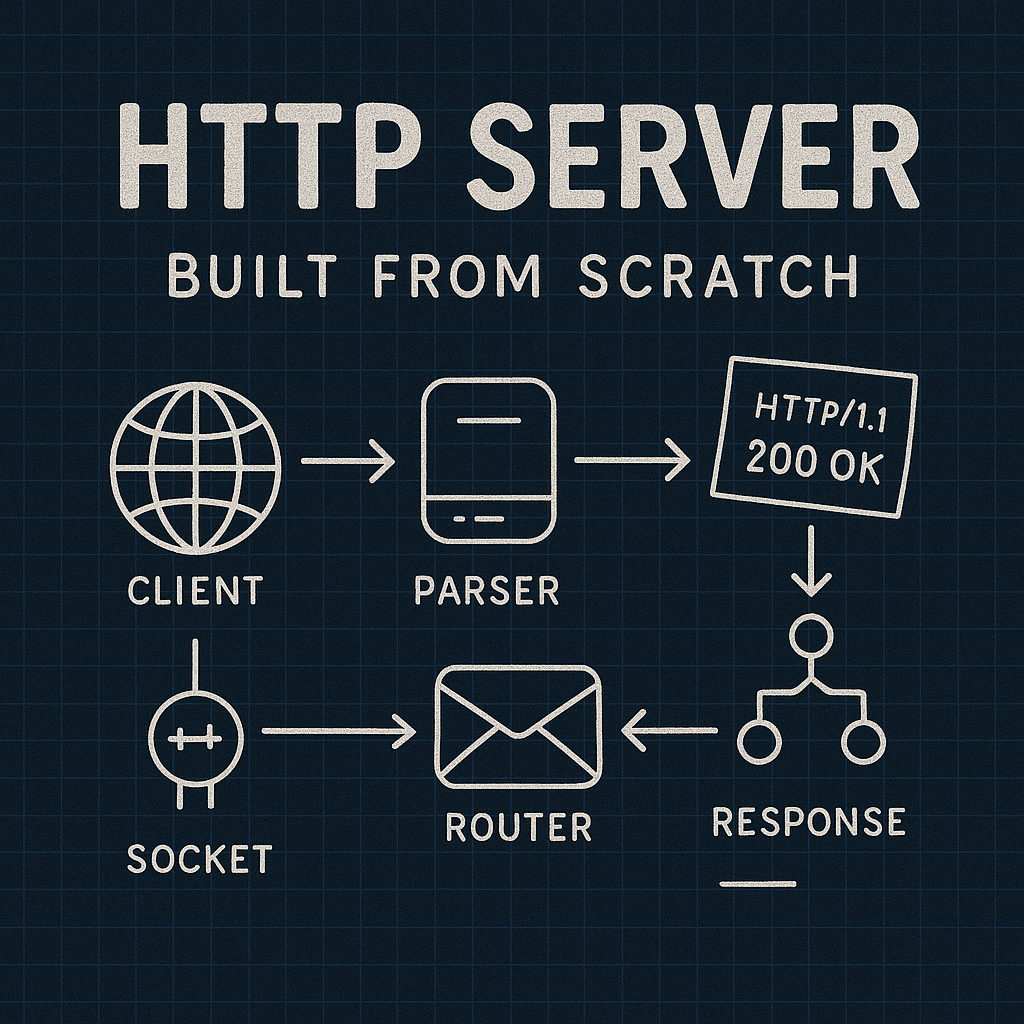
Creating your own HTTP Server from scratch using Python
We will create our own HTTP server from scratch using raw TCP sockets in Python, super fun and interesting to know how things work under the hood. I will demystify the working of HTTP
Note: source code for this entire project can be found on my GitHub repository Although I suggest you not to look at this before you complete this reading because it could overwhelm you initially.
Introduction
If you are a developer whether backend or frontend, Chances are that you regularly work with HTTP Servers.
You would know different status codes like 200 (OK), 404 (Not Found), 500 (Internal Server Error)
You regularly deal with endpoints, cookies, headers, tokens, authentication, authorization, etc.
- But do you really understand them?
- Do you know how the server works?
- what your favourite library or framework is doing behind the scenes when you create an endpoint?
- how does a server differentiate between a GET and POST request, or is it really that different?
- How does a server set cookie into the browser?
In this article we will explore and answer all of that questions and many more.
From creating our own server using raw TCP sockets to handling HTTP endpoints, payload, cookies, serving http pages and much more.
My only goal from this article is to awaken your curiosity so that you can explore even further!
What are Sockets and How Deep Can We Go When We Say “From Scratch”?
Let’s address the elephant in the room first: when we say we’re creating an HTTP server “from scratch,” we’re talking about going deep to the socket level—the fundamental building blocks of network communication.
The Foundation: Operating System Socket APIs
All operating systems, whether Windows or Unix-based systems like macOS and Linux, have built-in APIs for handling socket connections. These APIs are exposed for use by applications, providing the essential interface between your program and the network layer.
What Exactly Is a Socket?
A network socket is a communication endpoint within a computer network that allows programs to send and receive data. It essentially acts as a point of access for network traffic, enabling two-way communication between applications. A socket is identified by a unique combination of an IP address and a port number.
The Cup-and-String Analogy
Think of sockets like a childhood telephone system. Remember creating that simple communication device by connecting two cups with a string? You probably felt like quite the inventor!

This simple device perfectly illustrates how sockets work:
The Communication Pattern:
- Speaker and Listener Roles: In any communication, there must be a speaker and a listener. If both parties are speaking simultaneously with no one listening, communication breaks down completely.
- Socket Roles: Consider those two cups as two different sockets—Socket A (sender) and Socket B (receiver).
- Unidirectional Nature: Each cup can act as either a sender or receiver, but not both simultaneously. This is a crucial concept in understanding how network communication flows.
How Sockets Work in Practice
Operating System Interface: Operating systems provide powerful APIs such as socket.h that allow your programs to:
- Listen on specific sockets for incoming connections
- Send data to other sockets anywhere on the network
- Receive data from remote sockets
Socket Availability:
- There are approximately 65,535 network ports available on a computer
- These are logical abstractions, not physical hardware sockets
- Each port can be bound to a specific application or service
Since Python is written in C language so the socket module (inbuilt module) of Python internally calls the socket.h which in turn makes syscalls to kernel.

You could technically go deep down and directly interact with socket.h or study the socket.h itself and directly make sys calls to Linux kernel. But I believe Python’s socket module is a good starting point before going that deep because it essentially is the same thing just in python
Reality Check
What “From Scratch” Really Means: When we say we’re building an HTTP server “from scratch,” we mean:
- ✅ Direct use of OS-provided socket APIs through python’s socket module
- ✅ No high-level web frameworks (like Flask, Express, etc.)
- ✅ Manual handling of HTTP protocol details
- ✅ Raw socket programming for network communication
What We’re NOT Doing:
- ❌ Writing our own TCP/IP stack
- ❌ Implementing network drivers
- ❌ Building the operating system’s networking layer
Key Socket Concepts
Socket Types:
- TCP Sockets (
SOCK_STREAM): Reliable, connection-oriented communication - UDP Sockets (
SOCK_DGRAM): Fast, connection-less communication
Socket States:
- Listening: Waiting for incoming connections
- Connected: Actively communicating with another socket
- Closed: No active communication
Socket Identification: Every socket is uniquely identified by:
- IP Address: Where the socket is located (e.g.,
192.168.1.100) - Port Number: Which specific service on that machine (e.g.,
9000)
We're leveraging the operating system's networking capabilities directly, without relying on abstraction layers that hide the fundamental mechanics of network communication. This approach provides the deepest understanding of how HTTP servers truly function under the hood.
Building a Simple HTTP Server
This section walks through creating a basic HTTP server from scratch using Python’s built-in socket library. We’ll build a minimal web server that can accept HTTP requests and send back responses.
Code Overview
Copy the below code snippet and run in your local system as app.py:
1
2
3
4
5
6
7
8
9
10
11
12
13
14
15
16
17
18
19
20
21
22
23
24
25
26
27
28
29
30
31
32
33
34
35
36
import socket

class HttpServer:
    def __init__(self):
        self.SERVER_HOST = '0.0.0.0'
        self.SERVER_PORT = 9000
        self.sock = None

    def build_server(self):
        """Build a socket of IPV4 and TCP."""
        sock = socket.socket(socket.AF_INET, socket.SOCK_STREAM)
        sock.setsockopt(socket.SOL_SOCKET, socket.SO_REUSEADDR, 1)
        sock.bind((self.SERVER_HOST, self.SERVER_PORT))
        sock.listen(100)
        print("Server is listening on %s..." % self.SERVER_PORT)
        return sock

    def run(self):
        """Accepts connections in a continuous loop"""
        self.sock = self.build_server()

        while True:
            client_connection, client_address = self.sock.accept()
            print(client_address)

            request = client_connection.recv(1024).decode()
            if len(request) == 0:
                continue
            print(request)
            response = "HTTP/1.0 200 OK\n\nHello World\n".encode()
            client_connection.sendall(response)
            client_connection.close()

if __name__ == "__main__":
    server = HttpServer()
    server.run()
Code Breakdown
Class Initialization
1
2
3
4
def __init__(self):
    self.SERVER_HOST = '0.0.0.0'
    self.SERVER_PORT = 9000
    self.sock = None
SERVER_HOST = '0.0.0.0': Binds to all available network interfaces, making the server accessible from any IP addressSERVER_PORT = 9000: The port number where our server will listen for incoming requestssock = None: Placeholder for the socket object that will be created later
Building the Server Socket
1
2
3
4
5
6
def build_server(self):
    sock = socket.socket(socket.AF_INET, socket.SOCK_STREAM)
    sock.setsockopt(socket.SOL_SOCKET, socket.SO_REUSEADDR, 1)
    sock.bind((self.SERVER_HOST, self.SERVER_PORT))
    sock.listen(100)
    return sock
socket.AF_INET: Specifies IPv4 address familysocket.SOCK_STREAM: Uses TCP protocol for reliable data transmissionsetsockopt(socket.SOL_SOCKET, socket.SO_REUSEADDR, 1): Allows reusing the same address/port immediately after the server stopsbind(): Associates the socket with the specified host and portlisten(100): Puts the socket in listening mode with a backlog of up to 100 connections
Handling Client Connections
1
2
3
4
5
6
7
def run(self):
    while True:
        client_connection, client_address = self.sock.accept()
        request = client_connection.recv(1024).decode()
        response = "HTTP/1.0 200 OK\n\nHello World\n".encode()
        client_connection.sendall(response)
        client_connection.close()
accept(): Blocks until a client connects, returns connection object and client addressrecv(1024): Receives up to 1024 bytes of data from the clientdecode(): Converts received bytes to a readable string- HTTP Response Structure:
HTTP/1.0 200 OK: Status line indicating successful response- Empty line separates headers from body
Hello World: The actual response content
encode(): Converts the response string back to bytes for transmissionclose(): Closes the connection after sending the response, this is very important otherwise your client will be stuck waiting forever to receive more in response
Highlights
- Server Loop: Continuous listening and processing of client requests
- Connection Handling: Accept → Receive → Process → Respond → Close cycle
Don’t bother trying too hard to understand everything now - the concepts will become clearer as we progress through the tutorial.
When you run the code in your terminal, you should see output similar to this:

This confirms that your server is running and listening on port 9000 as expected. You can test it by opening your browser and navigating to http://localhost:9000 - you should see “Hello World” displayed on the page.
Using Telnet to Test the Server
We will use telnet to hit our server endpoint. Telnet is an excellent program that will expose you to the simplicity of HTTP protocol as opposed to calling it from Postman.
Installation
Now open another terminal, make sure you have telnet program installed.
Ubuntu users can install the telnet using from inetutils-telnet package.
1
sudo apt install inetutils-telnet
You can find the online instruction for your operating system for telnet installation.
Connecting to the Server
Since we hosted our server locally and on port 9000 we will call the telnet with below command:
1
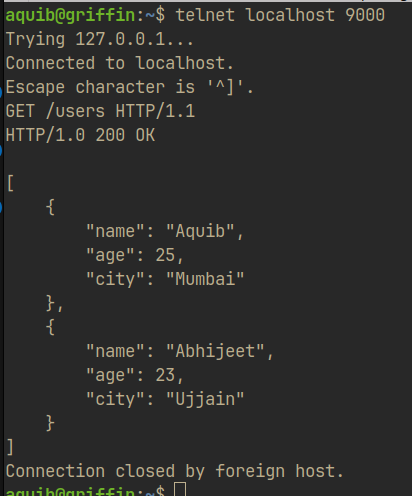
telnet localhost 9000
You would notice as soon as you connect, the address and port of the client is printed on the server side in a round brackets. ('127.0.0.1', 39246).
Now this is because we are sending request from the same machine so we get the home address of 127.0.0.1, the port 39246 isn’t fixed it will differ from time to time and machine to machine, it’s basically allocated from the OS on whatever port was available at the time.
Making a Request
Now that we are connected, this would kind of make you enter to the portal where you can interact with the server.
Now enter the below text on terminal and press enter:
1
GET /
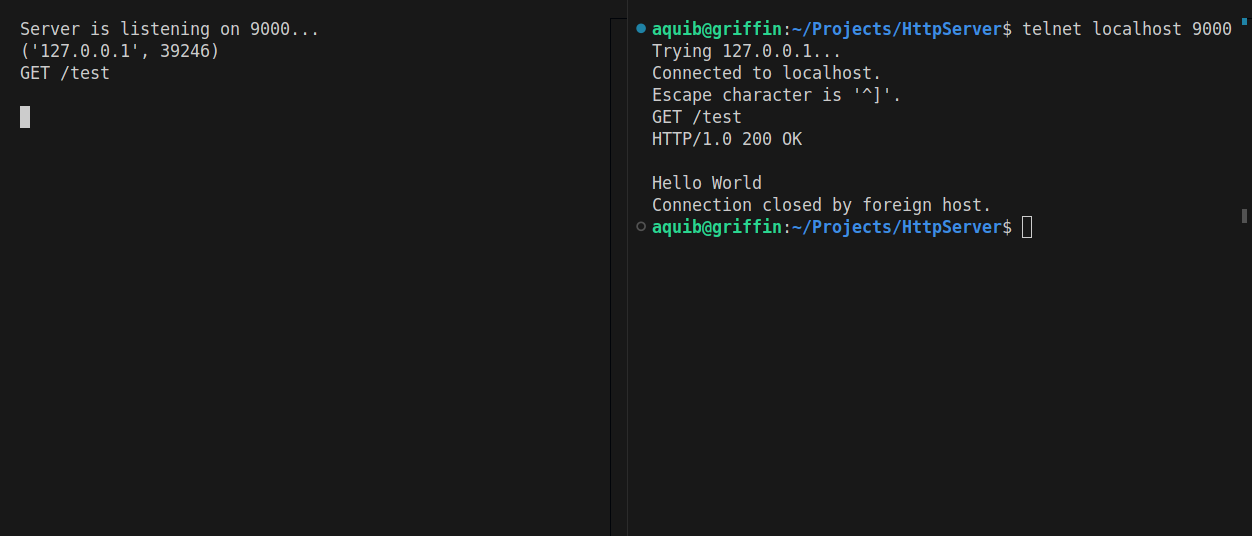
You can see the Hello World that was returned by our very own server.
Well, what’s that HTTP/1.0 200 OK? and why did we return that in our code? That the HTTP version and the return status code.
Comparing with Browser
To understand better try hitting the same endpoint using your browser (yes you can!) head over to your browser and go to localhost:9000 open the network tab as well to see the results.
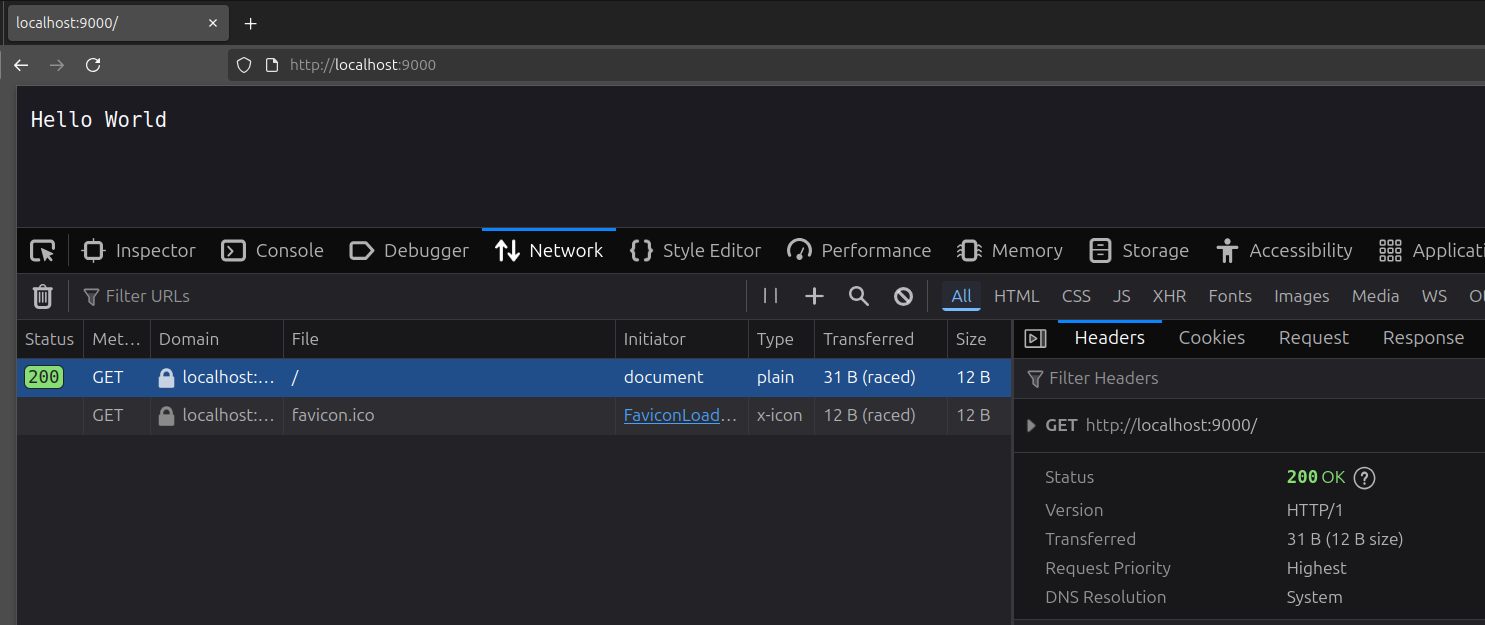
We only got the Hello World this time and instead the HTTP version and status was shown in the network tab. Why??
Understanding the Structure of HTTP Request-Response
The Nature of HTTP
It turns out that a standard HTTP request and response is just a text with a certain structure.
Think of the HTTP protocol as a simple chat server and client where they follow some standard practices like the first word should be the protocol version followed by the status code and then headers and the payload will come at last.
HTTP Headers
The server printed out a hell lot of information! What is that???
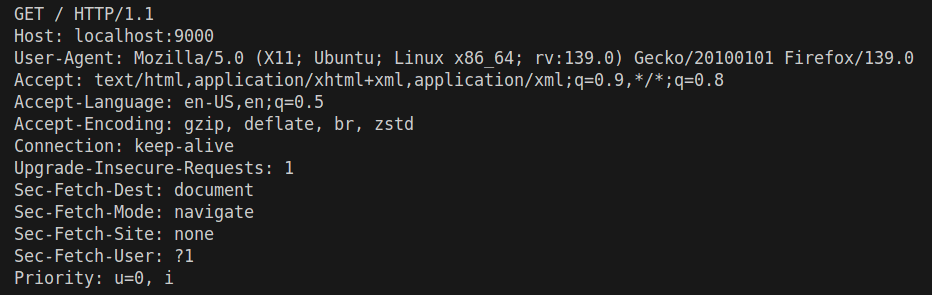
These were the headers sent by the browser to our server. Such headers help the server in understanding who the client is and what they want.
These headers can include other information like:
Authorizationtoken (we will see this in future)- Accepted encoding
- Accepted compression algorithm
- User Agent (in our case we were using Firefox on Ubuntu Linux)
- Any other information that you want to add
These headers can be anything. After all they are just a : colon separated key and value pairs.
HTTP Message Anatomy

Request Structure
The first line of Request consists of:
- Type of request (
GET,POST,PUT,DELETE…) - Followed by the path or the endpoint (
/) - And then the HTTP version (
1.1)
Response Structure
The first line of Response consists of:
- HTTP version (
1.1) - Followed by the
Status Codeand its message like200 OK,404 NOT FOUND,403 FORBIDDEN, etc.
Message Format
- Then there is a line break (
\n) before starting request headers/server headers - You will also notice a pattern that in both request and response there are 2 line breaks
\n\nbefore adding payload/body.
That’s it! That’s how simple HTTP is. It’s just text!
It is a good time to revisit the code and tinker around.
Parsing client request
You can try this combination with GET /test, GET /abc it will all return the same Hello World this is because we haven’t yet handled what will happen when the client hits us with a certain path, we are currently giving the same response of hello world for all the path.
From what we observed from previous section in the client’s request is that it has 3 parts separated by a single space. so splitting the incoming request in 3 parts will give us the request type, path, and protocol version.
1
GET /test HTTP/1.1
After the first line we have headers in the form of key value pairs followed by the payload, see structure of http
We need to build an HTTP Request Parser
First let’s build an Enum HttpMethodType to represent all the possible cases of HTTP Verbs that we will be handling
1
2
3
4
5
class HttpMethodType(Enum):
    GET = 1
    POST = 2
    PUT = 3
    DELETE = 4
Create a class primarily for storing the data related to request in a single object, you could go without doing any of these fancy stuff but this helps keep the code cleaner and saves you time and energy if you wanted to expand the project further.
1
2
3
4
5
6
7
8
9
10
11
12
13
14
15
16
17
class HttpRequest:
def __init__(self, method_type: HttpMethodType, path: str, protocol: str, headers:dict, payload=None):
self.method = method_type
self.path = path
self.payload = payload
self.protocol = protocol
self.headers = headers
def __str__(self):
return f"""
METHOD: {self.method}
PATH: {self.path}
PROTOCOL: {self.protocol}
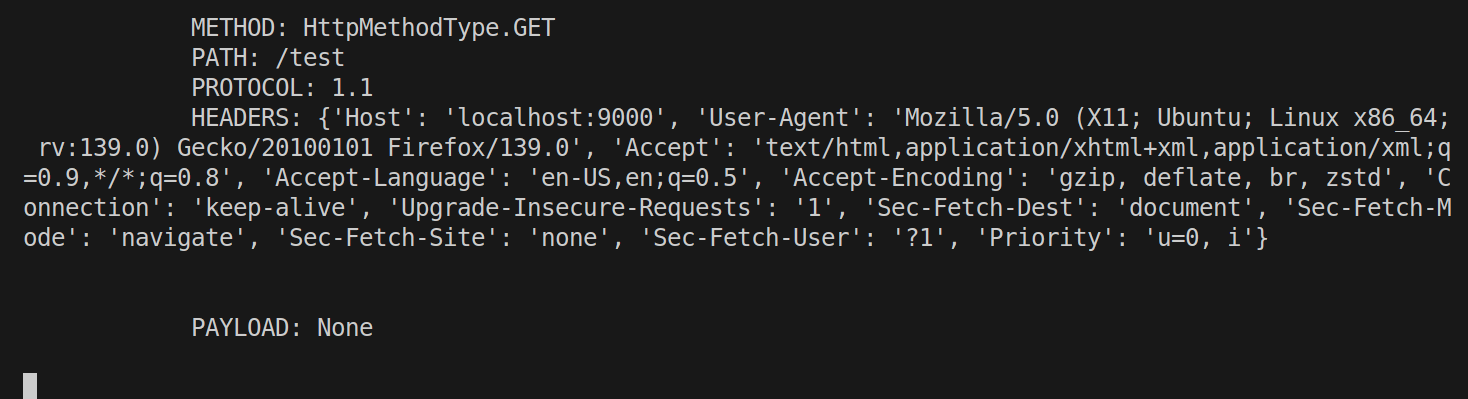
HEADERS: {self.headers}\n\n
PAYLOAD: {self.payload}
"""
Create a request parser with a static method which returns the HttpRequest object after determining the method, path, protocol and payload
1
2
3
4
5
6
7
8
9
10
11
12
13
14
15
16
17
18
19
20
21
22
23
24
25
26
27
28
29
30
31
32
33
34
35
36
37
38
39
40
41
42
43
44
45
46
47
48
49
50
51
52
53
54
55
56
57
58
59
60
61
62
63
64
65
66
67
68
69
70
71
72
73
class RequestParser():
    @staticmethod
    def parse(request:str) -> HttpRequest:
        """
        Parses a request and consisely seperates out different part of a user request.

        Args:
            request (str):
                Request text given by client, typically as a result of .recv()
                call on connection object
        """
        headers = {}
        request_parts = {}

        request_lines = request.split("\n")

        for i in range(len(request_lines)):
            line = request_lines[i]

            if line.strip() == '':
                break

            # First line of request contains method type, path and protocol
            if i == 0:
                method, path, protocol = line.split()

                if method == "GET":
                    request_parts["method"] = HttpMethodType.GET

                elif method == "POST":
                    request_parts["method"] = HttpMethodType.POST

                elif method == "PUT":
                    request_parts["method"] = HttpMethodType.PUT

                elif method == "DELETE":
                    request_parts["method"] = HttpMethodType.DELETE


                request_parts["path"] = path
                request_parts["http_version"] = protocol.split("/")[1]

                logging.debug("request parts:\n", request_parts)

                continue

            # seperate key and value from headers
            key = ""
            pos = 0
			# There are simpler ways to achieving this, but for some reason I love writing while loops
            while (pos < len(line) and line[pos] != ":"):
                key += line[pos]
                pos += 1

            value = line[pos+1:].strip()

            headers[key] = value

        json_payload = None

        if method == "POST" or method == "PUT":
            raw_payload = ''.join(request_lines[i:])
            json_payload = json.loads(raw_payload)

        request_object = HttpRequest(
                request_parts["method"],
                request_parts["path"],
                request_parts["http_version"],
                headers,
                json_payload
            )

        return request_object
Now we could simply plug this into our main loop at this place this might look to you like an overkill to you but this would become super helpful when we start handling POST request and add other advanced features.
1
2
3
4
5
6
7
            request = client_connection.recv(1024).decode()

            if len(request) == 0:
                continue

            parsed_request = RequestParser.parse(request)
            print(parsed_requests)
Now we can see that the incoming requests are neatly organized and parsed
Understanding the RequestParser Code
Let’s break down what’s happening in the RequestParser.parse() method step by step:
1. Initial Setup
1
2
3
headers = {}
request_parts = {}
request_lines = request.split("\n")
We create empty dictionaries to store headers and request components, then split the entire request string by newlines to process each line individually.
2. Processing Each Line The parser iterates through each line of the request. The key insight is understanding the HTTP message structure:
- First line: Contains method, path, and protocol
- Subsequent lines: Headers in
key: valueformat - Empty line: Signals the end of headers
- Remaining lines: The request body/payload
3. Parsing the First Line
1
2
if i == 0:
    method, path, protocol = line.split()
The first line is split by spaces to extract the three components. For example, GET /api/users HTTP/1.1 becomes:
method= “GET”path= “/api/users”protocol= “HTTP/1.1”
The method string is then converted to our HttpMethodType enum, and the protocol version is extracted by splitting on “/” and taking the second part.
4. Header Parsing Logic
1
2
3
4
while (pos < len(line) and line[pos] != ":"):
    key += line[pos]
    pos += 1
value = line[pos+1:].strip()
This while loop manually finds the colon separator in each header line. While there are simpler ways (like using line.split(":", 1)), this approach gives you fine-grained control and helps understand the parsing process character by character.
5. Payload Handling
1
2
3
if method == "POST" or method == "PUT":
    raw_payload = ''.join(request_lines[i:])
    json_payload = json.loads(raw_payload)
For POST and PUT requests, we expect a JSON payload. The code joins all remaining lines after the headers (starting from index i) and attempts to parse it as JSON.
6. Object Construction Finally, all the parsed components are used to create and return an HttpRequest object, giving us a clean, structured representation of the incoming request that we can easily work with in our server logic.
This parser transforms raw HTTP text into a structured Python object, making it much easier to handle different types of requests and route them appropriately in our server.
Handling endpoints and responses
Now it’s time to take control!
We want to see that same Hello World for every request path? No, we don’t
So let’s get started.
First of all, it’s as simple as an if condition (really!)
Let’s test it by slapping a conditional for handling /users route
1
2
3
4
5
6
7
8
9
10
11
12
13
14
15
16
17
18
19
20
21
22
            parsed_request = RequestParser.parse(request)

            if parsed_request.path == "/users":
                users = [
                    {
                        "name":"Aquib",
                        "age": 25,
                        "city": "Mumbai"
                    },
                    {
                        "name":"Abhijeet",
                        "age": 23,
                        "city": "Ujjain"
                    }
                ]
                response = "HTTP/1.0 200 OK\n\n"
                response += json.dumps(users, indent=4)
                response = response.encode()
            else:
                response = "HTTP/1.0 200 OK\n\nHello World\n".encode()

            client_connection.sendall(response)
the json.dumps we used helps convert our users dictionary to JSON string that we can append in the response and send over to the client.
Let’s test this bad boy
You can do a similar test on browser or postman

Now, try creating your own custom endpoints and responses using this same logic tinker around and have fun!
Building a Static Content Provider module
Static data refers to files that don’t change dynamically based on user input or server-side processing. These are pre-existing files stored on your server, served directly to clients without modification. Examples include HTML pages, images (JPEG, PNG), videos (MP4), stylesheets (CSS), scripts (JavaScript), and documents (PDFs). Unlike dynamic content, which is generated on-the-fly (e.g., from database queries), static content is read from the file system and sent as-is, making it simpler and faster to serve.
Understanding Content Types
When sending data to the client, we encode it into bytes, whether it’s text (e.g., HTML) or binary (e.g., images). To help the client interpret the data correctly, we include a Content-Type header in the response, specifying the MIME type (e.g., application/json for JSON, image/jpeg for JPEG images). This is just text appended to the response, following the HTTP protocol’s structure.
Let’s create a content_types.json file to map file extensions to their MIME types:
1
2
3
4
5
6
7
{
    "jpg": "image/jpeg",
    "html": "text/html",
    "png": "image/png",
    "mp4": "video/mp4",
    "ico": "image/x-icon"
}
Building the StaticContentProvider Class
We need a module to handle static content, separating it from dynamic endpoints like /users. This ensures requests for files (e.g., /home.html, /profile.jpg) are handled differently from requests requiring logic (e.g., /users). The StaticContentProvider class will fetch files from a static folder and return their contents with the correct MIME type.
Here’s the code for static_content_provider.py:
1
2
3
4
5
6
7
8
9
10
11
12
13
14
15
16
17
18
19
20
21
22
23
24
25
26
27
28
29
30
31
32
33
34
35
36
37
38
39
40
41
42
43
44
45
46
47
48
49
50
51
52
53
54
55
56
57
58
59
60
61
62
63
import os


class StaticContent:
    def __init__(self, content, content_type):
        self.content = content
        self.content_type = content_type


class StaticContentProvider:
    def __init__(self, static_data_folder, content_types):
        self.STATIC_DATA_FOLDER = static_data_folder
        self.SUPPORTED_CONTENT_TYPES = content_types

    def __resource_exists(self, resource: str) -> bool:
        return os.path.exists(resource)


    def __build_resource_path(self, resource: str) -> str:
        return os.path.join(self.STATIC_DATA_FOLDER, resource[1:])


    def __fetch_resource(self, full_resource_path: str) -> bytes | None:
        """Fetches the content from the resource and sends it as bytes."""

        fp = None

        fp = open(file=full_resource_path, mode='rb')

        content = fp.read()
        fp.close()

        return content


    def __get_resource_content_type(self, resource) -> str | None:
        """Gets the content type of resource."""

        file_format = ""

        i = len(resource)-1

        while ((c := resource[i]) != "."):
            file_format = c + file_format
            i -= 1

        if file_format not in self.SUPPORTED_CONTENT_TYPES:
            return None

        return self.SUPPORTED_CONTENT_TYPES[file_format]


    def resolve(self, resource) -> StaticContent | None:

        full_resource_path = self.__build_resource_path(resource)

        if not self.__resource_exists(full_resource_path):
            return None

        content_type = self.__get_resource_content_type(full_resource_path)
        content = self.__fetch_resource(full_resource_path)

        return StaticContent(content, content_type)
Code Breakdown
Let’s break down each part of the StaticContentProvider class:
-
StaticContent Class:
- A simple data structure holding the file content (as bytes) and its MIME type (e.g.,
text/htmlfor HTML files). - Used to return both pieces of information from the
resolvemethod.
- A simple data structure holding the file content (as bytes) and its MIME type (e.g.,
-
**init**:
- Takes
static_data_folder(e.g.,static) andcontent_types(fromcontent_types.json). - Stores these as instance variables for use in other methods.
- Takes
-
__build_resource_path:
- Constructs the full file path by joining
static_data_folderwith the requested resource path. - Strips the leading
/(e.g.,/index.htmlbecomesstatic/index.html). - Uses
os.path.joinfor cross-platform compatibility.
- Constructs the full file path by joining
-
__resource_exists:
- Checks if the file exists using
os.path.exists. - Returns
Trueif the file exists,Falseotherwise.
- Checks if the file exists using
-
__fetch_resource:
- Opens the file in binary read mode (
'rb') to handle both text (e.g., HTML) and binary (e.g., images, videos) content. - Reads the entire file, closes it, and returns the content as bytes.
- Opens the file in binary read mode (
-
__get_resource_content_type:
- Extracts the file extension by iterating backward until it finds a
.. - Looks up the extension in
SUPPORTED_CONTENT_TYPESto get the MIME type (e.g.,jpg→image/jpeg). - Returns
Noneif the extension isn’t supported.
- Extracts the file extension by iterating backward until it finds a
-
resolve:
- The main public method.
- Builds the full path, checks if the file exists, and if so, fetches its content and MIME type.
- Returns a
StaticContentobject orNoneif the file doesn’t exist or the type isn’t supported.
The double-underscore methods (e.g., __fetch_resource) are intended as private, encapsulating internal logic. The resolve method is the primary interface for requesting static content.
Initializing the Static Content Provider
To use StaticContentProvider, we need to initialize it with the static folder and content types. Let’s create a startup.py module to handle this:
1
2
3
4
5
6
7
8
9
10
11
12
13
14
import json
from static_content_provider import StaticContentProvider

def load_config(filename: str):
    return json.load(open(filename))

def get_supported_content_types():
    return load_config('content_types.json')

def get_static_content_provider() -> StaticContentProvider:
    return StaticContentProvider(
        static_data_folder='static',
        content_types=get_supported_content_types()
        )
This module:
- Loads
content_types.jsonusingload_config. - Creates a
StaticContentProviderinstance with thestaticfolder and content types.
Integrating Static Content into the Server
We’ll update the server loop from the “Handling endpoints and responses” section to handle static content requests (paths starting with /static or /favicon.ico) using StaticContentProvider. We’ll use the basic response construction method (manual string building) since we haven’t introduced a response builder yet.
Here’s the updated server.py:
1
2
3
4
5
6
7
8
9
10
11
12
13
14
15
16
17
18
19
20
21
22
23
24
25
26
27
28
29
30
31
32
33
34
35
36
37
38
39
40
41
42
43
44
45
46
47
48
49
50
51
52
53
54
55
56
57
58
59
60
61
62
63
64
65
66
67
68
69
70
71
72
73
74
75
76
77
78
import json
import socket
import startup
from request_parser import RequestParser, HttpMethodType

class HttpServer:
    def __init__(self):
        self.SERVER_HOST = '0.0.0.0'
        self.SERVER_PORT = 8000
        self.STATIC_DATA_FOLDER = 'static'
        self.static_content_provider = startup.get_static_content_provider()
        self.sock = None

    def build_server(self):
        """Build a socket of IPV4 and TCP."""
        sock = socket.socket(socket.AF_INET, socket.SOCK_STREAM)
        sock.setsockopt(socket.SOL_SOCKET, socket.SO_REUSEADDR, 1)
        sock.bind((self.SERVER_HOST, self.SERVER_PORT))
        sock.listen(100)
        print("Server is listening on %s..." % self.SERVER_PORT)
        return sock

    def run(self):
        """Accepts connections in a continuous loop"""
        self.sock = self.build_server()

        while True:
            client_connection, client_address = self.sock.accept()
            print(client_address)

            request = client_connection.recv(1024).decode()
            if len(request) == 0:
                continue

            parsed_request = RequestParser.parse(request)

            response = None

            # Handle get request for static content
            if (parsed_request.path.startswith("/static") or parsed_request.path == "/favicon.ico")\
                    and parsed_request.method is HttpMethodType.GET:

                static_content_details = self.static_content_provider\
                                             .resolve(parsed_request.path.replace("/static", "", 1))

                if static_content_details is None:
                    response = "HTTP/1.0 404 NOT FOUND\n\nResource Not Found\n".encode()
                else:
                    response = f"HTTP/1.0 200 OK\nContent-Type: {static_content_details.content_type}\n\n".encode() + static_content_details.content

            # Handle dynamic endpoints
            elif parsed_request.path == "/users":
                users = [
                    {
                        "name": "Aquib",
                        "age": 25,
                        "city": "Mumbai"
                    },
                    {
                        "name": "Abhijeet",
                        "age": 23,
                        "city": "Ujjain"
                    }
                ]
                response = "HTTP/1.0 200 OK\n\n"
                response += json.dumps(users, indent=4)
                response = response.encode()

            # Default response
            else:
                response = "HTTP/1.0 200 OK\n\nHello World\n".encode()

            client_connection.sendall(response)
            client_connection.close()

if __name__ == "__main__":
    server = HttpServer()
    server.run()
Explanation of Integration
-
Initialization:
- In
HttpServer.__init__, we callstartup.get_static_content_provider()to initialize theStaticContentProviderwith thestaticfolder and content types fromcontent_types.json.
- In
-
Static Path Handling:
- In the
runmethod, we check if the request path starts with/staticor is/favicon.icoand the method is GET. - For
/staticpaths, we strip the/staticprefix (e.g.,/static/index.html→/index.html) before passing toresolve. - If
resolvereturnsNone(file not found or unsupported type), we return a 404 response with “Resource Not Found”. - If content is found, we construct a 200 OK response with the
Content-Typeheader set to the file’s MIME type, followed by the file content.
- In the
-
Response Construction:
- We use the same manual string-building approach as in the
/usersendpoint, appending theContent-Typeheader and content, then encoding to bytes.
- We use the same manual string-building approach as in the
Setting Up the Static Folder
Create a static folder in your project directory and add some test files:
-
static/index.html:1 2 3 4 5 6 7 8 9
<!DOCTYPE html> <html> <head> <title>Welcome</title> </head> <body> <h1>Welcome to My HTTP Server!</h1> </body> </html>
-
static/image.jpg: Add a JPEG image. -
static/video.mp4: Add a small MP4 video file.
Ensure content_types.json is in the project root with the MIME types shown earlier.
Testing Static Content
-
Start the Server:
-
Run
python server.py. You should see:1
Server is listening on 8000...
-
The server is now listening for connections on port 8000.
-
-
Access Static Files:
- Open a browser and go to
http://localhost:8000/static/index.html. You should see “Welcome to My HTTP Server!”. - Try
http://localhost:8000/static/image.jpgto view the image. - Access
http://localhost:8000/static/video.mp4to play or download the video. - Visit
http://localhost:8000/favicon.ico. If no favicon.ico exists, you’ll get a 404 response.
- Open a browser and go to
-
Using curl:
-
Test with
curlto see the raw response:1
curl http://localhost:8000/static/index.html
Output should include the HTML content with headers:
1 2 3 4 5 6 7 8 9 10 11 12
HTTP/1.0 200 OK Content-Type: text/html <!DOCTYPE html> <html> <head> <title>Welcome</title> </head> <body> <h1>Welcome to My HTTP Server!</h1> </body> </html> -
For a non-existent file:
1
  curl http://localhost:8000/static/missing.txt
Output:
1
2
3
  HTTP/1.0 404 NOT FOUND

  Resource Not Found
-
Why This Matters
The StaticContentProvider separates static file serving from dynamic request handling, making our server modular and easier to maintain. By specifying MIME types, we ensure clients (like browsers) interpret the content correctly. You can extend this by adding more file types to content_types.json without changing the code.
In the next section, we’ll create a response builder to standardize how we construct HTTP responses, making it easier to handle headers and status codes for both static and dynamic content.
Building a Response Builder
To make our HTTP server more robust, we need a systematic way to construct HTTP responses. This includes setting the correct status codes, headers, and content in a reusable manner. Let’s create a HttpResponseBuilder class to handle this.
Response Builder Code
Here’s the code for our response builder, which constructs HTTP responses with proper formatting:
1
2
3
4
5
6
7
8
9
10
11
12
13
14
15
16
17
18
19
import json
from http_status import StatusCode

class HttpResponseBuilder:
    def __init__(self, http_version="1.0"):
        self.http_version = http_version

    def build(self, status_code: StatusCode, content: bytes | str, headers: dict = {}) -> str:
        if type(content) == str:
            content = content.encode()

        response = f"HTTP/{self.http_version} {str(status_code)}\n"

        for k, v in headers.items():
            response += (k + ":" + v + "\n")

        response += "\n"

        return response.encode() + content
Code Breakdown
- Initialization: The
HttpResponseBuildertakes an optionalhttp_versionparameter (defaulting to “1.0”) to specify the HTTP protocol version used in responses. - Build Method: The
buildmethod constructs the response:- Status Code: Takes a
StatusCodeobject (defined later) to include the status code and message (e.g., “200 OK”). - Content Handling: Accepts either a string or bytes for the content. If a string is provided, it’s encoded to bytes.
- Headers: Iterates over a dictionary of headers, formatting them as
key:value\n. - Response Structure: Combines the status line, headers, a blank line (
\n), and the content, encoding the final response as bytes.
- Status Code: Takes a
This class ensures our responses follow the HTTP protocol structure (status line, headers, blank line, body) and can handle various content types, such as JSON or static file data.
Defining HTTP Status Codes
To use the response builder effectively, we need a way to represent HTTP status codes. Let’s create a http_status.py module to define common status codes.
1
2
3
4
5
6
7
8
9
10
11
12
13
14
class StatusCode:
    def __init__(self, code: int, message: str):
        self.code = code
        self.message = message

    def __str__(self):
        return str(self.code) + " " + self.message


class HttpStatus:
    OK = StatusCode(200, "OK")
    NOT_FOUND = StatusCode(404, "NOT FOUND")
    BAD_REQUEST = StatusCode(400, "BAD REQUEST")
    INTERNAL_SERVER_ERROR = StatusCode(500, "INTERNAL SERVER ERROR")
Explanation
- StatusCode Class: A simple class to hold a status code (e.g., 200) and its message (e.g., “OK”). The
__str__method formats it as required by HTTP (e.g., “200 OK”). - HttpStatus Class: Defines common status codes as class attributes for easy access, such as
HttpStatus.OKorHttpStatus.NOT_FOUND.
This module allows us to pass structured status codes to the response builder, ensuring consistency across our server.
Managing User Data
To demonstrate dynamic content, let’s create a simple user management system. We’ll store user data in a JSON file and create a controller to handle operations like listing users and adding new ones.
User Controller Code
Here’s the user_controller.py module:
1
2
3
4
5
6
7
8
9
10
11
12
13
14
15
16
17
18
19
20
import json

class User:
    def __init__(self, name: str, age: int, city: str):
        self.name = name
        self.age = age
        self.city = city


class UserController:
    def __init__(self):
        self.db_path = "users.json"
        self.users = json.load(open(self.db_path, "r"))

    def get_user_list(self):
        return self.users

    def add_user(self, new_user: dict):
        self.users.append(new_user)
        json.dump(self.users, open(self.db_path, "w"), indent=4)
Explanation
- User Class: A simple data structure to represent a user with
name,age, andcity. (Note: While this class is defined, the current implementation uses raw dictionaries from the JSON file, but it could be extended to useUserobjects.) - UserController:
- Initialization: Loads user data from
users.jsoninto memory. - get_user_list: Returns the list of users.
- add_user: Appends a new user (provided as a dictionary) to the list and saves it back to the JSON file with proper indentation.
- Initialization: Loads user data from
The users.json file might look like this:
1
2
3
4
5
6
7
8
9
10
11
12
13
14
15
16
17
18
19
20
21
22
[
    {
        "name": "Aquib",
        "age": "25",
        "city": "Mumbai"
    },
    {
        "name": "Abhijeet",
        "age": "24",
        "city": "Ujjain"
    },
    {
        "name": "Prathamesh",
        "age": "25",
        "city": "Sangli"
    },
    {
        "name": "Riyaz",
        "age": "26",
        "city": "Mumbai"
    }
]
This setup allows our server to handle dynamic endpoints like /users for GET (list users) and POST (add a user) requests.
Mapping Endpoints to Controllers
To route requests to the appropriate handler functions, we need a way to map endpoints (like /users) and HTTP methods (like GET or POST) to specific controller methods. Let’s create a ControllerMap class.
Controller Map Code
Here’s the map.py module in the controllers directory:
1
2
3
4
5
6
7
8
9
10
11
12
13
14
15
16
17
18
19
20
21
22
23
24
25
26
27
28
from typing import Callable
from controllers.user_controller import UserController
from request_parser import HttpMethodType


class ControllerMap:
    def __init__(self, user_controller: UserController):
        self.user_controller = user_controller

        self.controller_map = {
            "/users" :
            [
                {
                    "method": HttpMethodType.GET,
                    "call": self.user_controller.get_user_list
                },
                {
                    "method": HttpMethodType.POST,
                    "call": self.user_controller.add_user
                },
            ]
        }

    def fetch_endpoint(self, key: str, method: HttpMethodType) -> Callable | None:
        for endpoint in self.controller_map.get(key, []):
            if endpoint["method"] is method:
                return endpoint["call"]
        return None
Explanation
- ControllerMap Initialization: Takes a
UserControllerinstance and defines a mapping of endpoints to handler functions. - controller_map: A dictionary where each key is an endpoint (e.g.,
/users) and the value is a list of dictionaries, each specifying an HTTP method and the corresponding controller method. - fetch_endpoint: Retrieves the appropriate handler function for a given endpoint and HTTP method, returning
Noneif no match is found.
This allows us to dynamically route requests to the correct controller method based on the path and HTTP method.
Initializing the Server Components
To tie everything together, we need a startup module to initialize our components, such as the static content provider and controller map.
Startup Code
Here’s the startup.py module:
1
2
3
4
5
6
7
8
9
10
11
12
13
14
15
16
17
18
19
20
21
22
import json

from controllers.map import ControllerMap
from controllers.user_controller import UserController
from static_content_provider import StaticContentProvider

def get_static_content_provider() -> StaticContentProvider:
    return StaticContentProvider(
        static_data_folder='static',
        content_types= get_supported_content_types()
        )

def load_config(filename: str):
    return json.load(open(filename))

def get_supported_content_types():
    return load_config('content_types.json')

def build_controller_map():
    return ControllerMap(
        user_controller=UserController()
        )
Explanation
- get_static_content_provider: Creates a
StaticContentProviderinstance, passing the static data folder and supported content types fromcontent_types.json. - load_config: A utility function to read JSON configuration files.
- get_supported_content_types: Loads the
content_types.jsonfile, which maps file extensions to MIME types. - build_controller_map: Initializes a
ControllerMapwith a newUserControllerinstance.
This module centralizes the setup of our server’s components, making the main server code cleaner.
Putting It All Together
Now, let’s update the main HttpServer class to integrate all these components and handle both static and dynamic requests.
Updated Server Code
Here’s the complete server.py:
1
2
3
4
5
6
7
8
9
10
11
12
13
14
15
16
17
18
19
20
21
22
23
24
25
26
27
28
29
30
31
32
33
34
35
36
37
38
39
40
41
42
43
44
45
46
47
48
49
50
51
52
53
54
55
56
57
58
59
60
61
62
63
64
65
66
67
68
69
70
71
72
73
74
75
76
77
78
79
80
81
82
83
84
85
86
87
88
89
90
91
92
93
94
import json
import socket
import startup

from http_status import HttpStatus
from request_parser import RequestParser, HttpMethodType
from response_builder import HttpResponseBuilder


class HttpServer:
    def __init__(self):
        self.SERVER_HOST = '0.0.0.0'
        self.SERVER_PORT = 8000
        self.STATIC_DATA_FOLDER = 'static'

        self.SUPPORTED_CONTENT_TYPES = startup.get_supported_content_types()
        self.sock = None
        self.controller_map = startup.build_controller_map()
        self.static_content_provider = startup.get_static_content_provider()

    def build_server(self):
        """Build a socket of IPV4 and TCP."""
        sock = socket.socket(socket.AF_INET, socket.SOCK_STREAM)
        sock.setsockopt(socket.SOL_SOCKET, socket.SO_REUSEADDR, 1)
        sock.bind((self.SERVER_HOST, self.SERVER_PORT))
        sock.listen(100)
        print("Server is listening on %s..." % self.SERVER_PORT)
        return sock

    def run(self):
        """Accepts connections in a continuous running"""

        self.sock = self.build_server()
        responseBuilder = HttpResponseBuilder()

        sock = self.sock

        while True:
            client_connection, client_address = sock.accept()
            print(client_address)

            request = client_connection.recv(1024).decode()

            if len(request) == 0:
                continue

            parsed_request = RequestParser.parse(request)

            response = None

            # Handle get request for static content
            if (parsed_request.path.startswith("/static") or parsed_request.path == "/favicon.ico")\
                    and parsed_request.method is HttpMethodType.GET:

                static_content_details = self.static_content_provider\
                                             .resolve(parsed_request.path.replace("/static", "", 1))

                if static_content_details is None:
                    response = responseBuilder.build(HttpStatus.NOT_FOUND, "Resource Not Found")
                else:
                    response = responseBuilder.build(HttpStatus.OK, static_content_details.content, {"Content-Type":static_content_details.content_type})

            else:
                routine = self.controller_map.fetch_endpoint(parsed_request.path, parsed_request.method)

                if routine is None:
                    response = responseBuilder.build(HttpStatus.NOT_FOUND, "Resource Not Found")
                else:
                    # Handle the GET and POST method appropriately
                    if parsed_request.method is HttpMethodType.GET:
                        data = routine()
                        serialized_data = json.dumps(data)
                        response = responseBuilder.build(HttpStatus.OK, serialized_data, {"Content-Type":"application/json"})

                    elif parsed_request.method is HttpMethodType.POST:
                        data = routine(parsed_request.payload)
                        serialized_data = json.dumps(data)
                        response = responseBuilder.build(HttpStatus.OK, serialized_data, {"Content-Type":"application/json"})

            client_connection.sendall(response)
            client_connection.close()

    def shutdown(self):
        self.sock.close()


if __name__ == "__main__":
        server = HttpServer()

        try:
            server.run()
        except Exception as e:
            print(e.with_traceback)
            server.shutdown()
Code Breakdown
- Initialization:
- Sets up the server host (
0.0.0.0) and port (8000). - Initializes the static content provider and controller map using the
startupmodule.
- Sets up the server host (
- build_server: Same as before, creates and configures the TCP socket.
- run:
- Enters a loop to accept client connections.
- Parses incoming requests using
RequestParser. - Handles two types of requests:
- Static Content: If the path starts with
/staticor is/favicon.icoand the method is GET, it uses theStaticContentProviderto resolve the file. If the file exists, it sends it with the appropriateContent-Typeheader; otherwise, it returns a 404. - Dynamic Endpoints: For other paths, it uses the
ControllerMapto find the appropriate handler function. If found, it calls the function (passing the payload for POST requests) and returns the result as JSON with a 200 status. If no handler is found, it returns a 404.
- Static Content: If the path starts with
- Uses
HttpResponseBuilderto construct the response in all cases.
- shutdown: Closes the socket gracefully.
Testing the Server
-
Static Content:
- Place an HTML file (e.g.,
index.html) in thestaticfolder. - Access it via
http://localhost:8000/static/index.htmlin your browser. - Similarly, test images or videos (e.g.,
http://localhost:8000/static/image.jpg).
- Place an HTML file (e.g.,
-
Dynamic Endpoints:
-
GET /users: Use a tool like Postman or
curlto send a GET request tohttp://localhost:8000/users. You should see the list of users fromusers.json.1
curl http://localhost:8000/users
Output:
1
2
3
4
5
6
  [
      {"name": "Aquib", "age": "25", "city": "Mumbai"},
      {"name": "Abhijeet", "age": "24", "city": "Ujjain"},
      {"name": "Prathamesh", "age": "25", "city": "Sangli"},
      {"name": "Riyaz", "age": "26", "city": "Mumbai"}
  ]
-
POST /users: Send a POST request with a JSON payload to add a new user.
1
  curl -X POST -H "Content-Type: application/json" -d '{"name":"John","age":"30","city":"Delhi"}' http://localhost:8000/users
This will append the new user to
users.jsonand return the updated list.
-
-
Error Handling:
- Try accessing a non-existent endpoint (e.g.,
http://localhost:8000/invalid). You should get a 404 response with “Resource Not Found”.
- Try accessing a non-existent endpoint (e.g.,
Server Running Output
When you run the server, you’ll see:
This indicates the server is listening on port 8000. As clients connect, their addresses will be printed, helping you debug incoming requests.
What’s Next?
Congratulations! You’ve built a functional HTTP server from scratch using Python’s socket library. It can:
- Serve static files (HTML, images, videos) with proper content types.
- Handle dynamic endpoints for GET and POST requests.
- Parse HTTP requests and construct proper responses.
- Manage a simple user database stored in JSON.
Ideas to Extend the Project
- Add More Endpoints: Extend the
ControllerMapto handle additional routes, such as/users/<id>for specific user details. - Support More HTTP Methods: Add handling for PUT and DELETE methods in the
UserController. - Improve Error Handling: Add validation for POST payloads to return
HttpStatus.BAD_REQUESTfor invalid data. - Add Logging: Enhance the logging in
RequestParserto log errors or invalid requests. - Serve More Static Content: Add support for CSS, JavaScript, or other file types by updating
content_types.json. - Database integration
- Controller logic: I think the controller defining logic could be centralised and also the endpoint parameters. The endpoint must be able to distinguish between parameter and payload.
Final Thoughts
By building this server, you’ve gained a deep understanding of how HTTP servers work under the hood. You’ve seen how sockets facilitate network communication, how HTTP requests and responses are structured, and how to handle both static and dynamic content. Keep experimenting with the code, and try adding new features to make it your own!
If you have any questions let me know via email !
Happy coding, and enjoy your journey into the world of network programming!